Plant propagation feels like magic the first time a cutting grows roots, and it becomes addictive the moment you realize one plant can turn into five without buying anything new.
This beginner-friendly guide will walk you through water propagation and soil propagation with stem cuttings, using simple methods that reduce rot, build confidence, and keep the process fun instead of stressful.
This content is independent and has no affiliation, sponsorship, or control by any entities mentioned.
Beginner guide to plant propagation: what propagation really means in real life
Propagation is the practice of creating a new plant from a piece of an existing plant, which can be a stem segment, a leaf, a division of roots, or a separated offshoot depending on the species.
For most popular houseplants, beginners get the fastest wins with stem cuttings, because stems usually carry the growth points that can form roots and shoots when conditions are right.
Instead of thinking “I’m cloning a plant,” it helps to think “I’m giving a healthy piece a stable environment so it can switch from leaf support to root production.”
Success comes from repeating a few fundamentals, including clean cuts, correct node placement, steady moisture, bright indirect light, and patience that lasts longer than your excitement.
Nothing about propagation requires expensive gear, although a few small upgrades can make the process smoother and reduce beginner mistakes that lead to mushy stems.
Propagation outcomes you can realistically expect
- A single vine plant can yield multiple cuttings, which often root in staggered waves rather than all at once.
- Leafy plants frequently produce roots first, then pause, then push new growth when they feel stable enough to spend energy upward.
- Some cuttings fail even when you do everything “right,” because plant tissue varies, timing matters, and learning includes a few losses.
- Rooting speed depends on light, temperature, and plant type, so a range is more realistic than a single “exact” number.
propagate houseplants with confidence: the three rules that prevent most failures
Healthy tissue roots more easily than stressed tissue, so taking cuttings from a thriving plant is like starting a race with a head start you can actually feel.
Clean tools matter because bacteria enter through fresh cuts, and rot often starts as a tiny problem that quietly expands until the cutting collapses.
Correct node placement matters because many houseplants form roots primarily from nodes, which are the little joints where leaves attach and where growth hormones concentrate.
The “3R” propagation rules for beginners
- Right piece: choose a mature-but-not-woody stem with healthy leaves and no active disease or pests.
- Right cut: cut cleanly with sanitized scissors or pruners, keeping the cut surface smooth rather than crushed.
- Right environment: provide steady moisture, warm-ish temperatures, and bright indirect light, while avoiding harsh sun that cooks the cutting.
Beginner guide to plant propagation: a quick toolkit that keeps it simple
A beginner kit can fit in a small drawer, and the goal is convenience, because convenience makes you repeat the habit and repetition builds skill.
Sharp scissors or pruners give a cleaner cut, which heals better than a torn stem, and a clean container prevents mysterious slime that beginners often blame on “bad luck.”
Transparent cups or jars are helpful for water propagation because they let you see root growth, and visibility boosts motivation when nothing seems to be happening.
Basic tools that cover most houseplant propagation
- Clean scissors or pruners, ideally dedicated to plant work so they stay sharp and sanitary.
- Rubbing alcohol or soap and hot water for quick tool cleaning before cutting.
- Small clear containers for water propagation, plus a few opaque options for experimenting.
- Fresh potting mix or a light propagation mix, depending on your comfort level.
- Small pots with drainage holes, because soggy soil is the fastest path to rot.
- Labels or masking tape, because “I’ll remember which is which” is a lie everyone tells once.
Optional upgrades that help without becoming complicated
- A humidity dome or a clear plastic bag used loosely, which can reduce dehydration for cuttings with many leaves.
- A simple grow light if your space is dim, because roots form more reliably with consistent brightness.
- Perlite or pumice to lighten soil mixes, because airy mixes dry more evenly and reduce rot risk.
- A small fan set on low across the room, because gentle circulation discourages mold without blasting the cuttings.
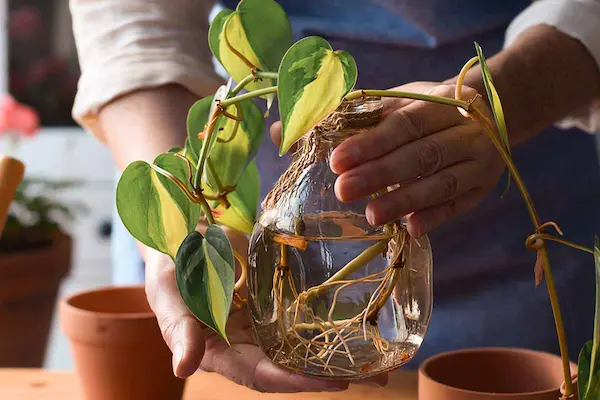
water propagation: why beginners love it and why it sometimes disappoints
Water propagation is popular because it feels interactive, since you can watch roots appear and feel like a plant scientist every time you change the water.
Water propagation can also disappoint when cuttings produce long, fragile water roots that struggle during the transition to soil, which is why aftercare matters as much as rooting.
Better results usually come from treating water as a temporary rooting station rather than a permanent home, unless the plant is specifically being grown in water long-term.
Best-fit plants for water propagation practice
- Pothos and heartleaf philodendron, because nodes root readily and tolerate beginner-level inconsistencies.
- Tradescantia, because it roots quickly and forgives imperfect cuts more than most plants.
- Monstera adansonii and similar vining aroids, because nodes often throw roots with steady warmth and light.
- Syngonium, because cuttings can root well in water when nodes are submerged correctly.
Step-by-step: water propagation that avoids the common rot spiral
- Pick a healthy stem with at least one node, and aim for two nodes if you want extra insurance.
- Make a clean cut just below a node, because that area tends to root more reliably.
- Remove leaves that would sit underwater, because submerged leaves decay and pollute the container fast.
- Place the cutting in clean water with the node submerged, while keeping remaining leaves above the waterline.
- Set the container in bright indirect light, because strong light drives energy without overheating tissue.
- Refresh the water when it looks cloudy or smells “off,” because stale water often signals bacterial buildup.
- Wait for roots to reach a few inches and branch slightly, because tiny nubs are fragile during potting.
Water propagation habits that improve results
- Use room-temperature water, because icy water can shock tender tissue and slow rooting.
- Choose a container that holds the stem steady, because wobbling can damage new root tips.
- Keep the setup away from heat vents, because warm drafts can dry leaves while the stem sits wet.
- Resist frequent handling, because pulling the cutting out to “check” roots can snap the very growth you’re waiting for.
stem cuttings: how to choose the perfect cutting without overthinking it
A good stem cutting balances maturity and flexibility, because a stem that is too young can collapse, while a stem that is too woody can root slowly.
Nodes matter more than leaf count, so prioritize at least one clear node, and consider two nodes when the plant is slow or when the cutting is small.
Leaf load matters because leaves lose moisture, and too many leaves can dehydrate the cutting before roots form, especially in dry apartments.
What to look for in a “high-potential” stem cutting
- Firm stem texture with no black spots, mushy areas, or suspicious lesions.
- Leaves that look hydrated and evenly colored, because stressed leaves usually mean stressed tissue overall.
- Visible nodes, aerial root nubs, or leaf joints that make rooting points obvious.
- No obvious pests, because propagating pests multiplies your problem for free.
How long should a cutting be for simple methods?
Many beginner-friendly cuttings land in a comfortable middle range, where the cutting has one to three nodes and enough leaf area to photosynthesize without acting like a thirsty umbrella.
Longer cuttings can work, yet they often demand more humidity control, more staking, and more patience during the transition to soil.
soil propagation: the method that builds stronger roots, with fewer transitions
Soil propagation can feel scarier because you cannot see roots, yet it often creates roots that adapt to potting conditions from day one, which can reduce transplant shock later.
Soil propagation works best when the mix is airy and evenly moist, because oxygen at the cut surface is what keeps the tissue from turning into mush.
A light propagation mix can be as simple as a standard potting mix made looser with perlite, because extra air space helps roots form while discouraging rot.
Step-by-step: soil propagation for first-timers
- Fill a small pot with a lightly moistened, airy mix, because bone-dry soil pulls moisture from the cutting too fast.
- Take a clean cutting with at least one node, and remove any leaves that would touch the soil line.
- Make a small hole with a pencil or chopstick, because pushing the cutting straight in can scrape tissue and invite rot.
- Insert the cutting so the node sits in the mix, then firm gently so the stem stands stable without being strangled.
- Water lightly to settle the mix, then let excess drain completely so the pot is damp, not dripping.
- Place the pot in bright indirect light, and keep temperatures comfortably warm if possible.
- Maintain even moisture, allowing slight drying near the top while keeping the root zone lightly damp.
Signals that soil propagation is working, even when you can’t see roots
- Leaves stay firm rather than drooping dramatically for days.
- New growth begins, even if it is small and slow at first.
- Gentle resistance appears when you lightly tug the cutting, because roots anchor the stem.
- Color remains stable and the stem stays firm at the soil line.
simple methods to boost rooting odds without fancy products
Propagation success often improves when you control dehydration, because a cutting without roots is living on stored water and whatever it can keep in its leaves.
Humidity support can be simple, such as loosely tenting a clear bag over a pot, as long as you also provide some airflow to prevent mold.
Light consistency matters because plants root best when energy input is steady, which means a bright spot that doesn’t swing from dark to blazing sun daily.
Beginner-friendly rooting boosters that cost little
- Use a clear bag as a humidity tent, while leaving a small opening for air exchange.
- Reduce leaf load by removing one or two leaves, which decreases moisture loss without stopping photosynthesis.
- Group propagation pots together, because shared moisture creates a gentle microclimate.
- Keep cuttings warm, because many houseplants root more readily when temperatures are comfortably above cool-room levels.
Beginner guide to plant propagation: easy species to start with
Choosing easy species is not “cheating,” because building early wins creates the confidence to try slower plants later without frustration.
Fast-rooting vines are ideal because nodes are obvious, stems are flexible, and the plants tolerate minor mistakes better than fragile species.
Beginner favorites that usually propagate well from stem cuttings
- Pothos varieties, because nodes root reliably and cuttings tolerate water or soil.
- Heartleaf philodendron, because it roots steadily and adapts well after potting.
- Tradescantia, because it roots quickly and can be restarted repeatedly.
- Syngonium, because nodes often root well when kept warm and evenly moist.
- Monstera adansonii, because aerial root nubs often turn into real roots with time.
Plants that can be propagated, but may frustrate first-timers
- Woody houseplants, because stems may root slowly and need stable conditions for longer periods.
- Very delicate thin-stem plants, because dehydration can happen before rooting begins.
- Succulents, because they require a different approach and rot easily if treated like tropical cuttings.
Time to root: realistic timelines without false promises
Rooting time varies widely, and pretending every cutting roots in “exactly ten days” sets beginners up for unnecessary anxiety and constant checking.
Many vining houseplants often show early root nubs within one to three weeks in bright indirect light, while sturdier roots and branching can take several additional weeks.
Soil-propagated cuttings may take a similar overall time, although the roots are hidden and the first visible proof may be a new leaf rather than a root strand.
Cool temperatures, low light, and stressed parent plants can stretch timelines, which means patience is not a personality trait here, since it is part of the method.
Common rooting ranges for easy indoor plants
- Fast vining plants: early roots often appear within a couple of weeks, with stronger rooting over the following weeks.
- Moderate growers: early roots may take a few weeks, with stable pot-ready roots taking longer.
- Slow or woody types: rooting can take many weeks, and occasional failures are normal even with good technique.
What “ready to pot” looks like in water propagation
- Multiple roots, not just one long string, because branching increases survival in soil.
- Root length that allows anchoring, while still looking firm and pale rather than brown and slimy.
- Some root thickness, because hair-thin roots can break easily during planting.
Rot prevention: how to avoid the mushy cutting heartbreak
Rot is usually a combination problem, where bacteria meet low oxygen and damaged tissue, and the result is a stem that turns soft at the base.
Water propagation rots faster when leaves sit underwater, when containers are dirty, or when water becomes cloudy and stagnant from decaying matter.
Soil propagation rots faster when the mix is heavy, when pots lack drainage, or when the cutting sits in constantly saturated conditions without enough oxygen.
Top rot causes, explained in beginner language
- Submerged leaves breaking down, which feeds bacteria and creates a slimy environment.
- Overly wet soil with no air pockets, which suffocates the cut surface before roots form.
- Crushed stems from dull tools, which creates bruised tissue that decomposes faster.
- Low light, because cuttings without energy sit wet and idle for too long.
- Cold rooms, because cold slows rooting while bacteria can still multiply.
Rot-proofing checklist you can follow every single time
- Sanitize cutting tools before each session, because one dirty cut can infect multiple stems.
- Remove underwater leaves and lower leaf stems, because clean nodes root better than messy ones.
- Use airy soil mixes and pots with drainage, because oxygen is as important as moisture.
- Keep light bright but indirect, because stable energy encourages rooting without overheating.
- Change water when it clouds, and wash containers when slime appears.
Water propagation to soil: the smooth transition that keeps cuttings alive
Transferring a cutting from water to soil is where many beginners lose plants, not because water propagation “doesn’t work,” but because the roots must adapt to a new moisture pattern.
Water-grown roots are used to constant water availability, while soil alternates between moist pockets and airy gaps, which means gradual adjustment improves survival.
Transition success increases when the soil is evenly moist at first, then allowed to dry slightly more as new soil-adapted roots form.
Step-by-step: potting water-rooted cuttings without shock
- Prepare a small pot with a light, airy mix, then pre-moisten it so it feels damp but not muddy.
- Plant the cutting gently, spreading roots without forcing them straight, because roots break easily when stretched.
- Firm the mix lightly, ensuring the cutting stands stable so new roots are not disturbed by wobbling.
- Water lightly to settle soil around roots, then let excess drain fully so the pot is not sitting in runoff.
- Keep the plant in bright indirect light, maintaining slightly higher moisture for the first week or two.
- Shift gradually toward a normal watering rhythm as new growth appears and the plant holds turgor confidently.
Common transition mistakes and the easy fixes
- Overpotting into a huge container, which keeps soil wet too long and increases rot risk, so choose small pots first.
- Letting the pot dry completely right away, which shocks water roots, so keep moisture steady at the start.
- Handling roots too roughly, which delays recovery, so treat roots like delicate threads.
Beginner guide to plant propagation: a fun “propagation day” routine
Turning propagation into a small ritual makes it enjoyable, and a fun system prevents the rushed mistakes that happen when you clip a cutting mid-scroll and hope for the best.
A simple routine also helps you track what works in your home, because your light, temperature, and habits are the real variables behind every success.
A playful but practical propagation routine
- Pick a day with good light, then gather tools and containers so you do not walk around dripping water later.
- Inspect the parent plant closely, because pests and diseases should be handled before you multiply them.
- Decide how many cuttings you truly want, because fewer well-prepped cuttings beat many sloppy ones.
- Label containers immediately, because memory fades faster than roots appear.
- Choose water or soil based on your patience and environment, because both methods work when matched to conditions.
- Set everything in a consistent location, because moving cuttings daily slows progress and increases damage risk.
Troubleshooting: when things look weird, but the cutting might still be okay
Propagation can look messy before it looks successful, so interpreting symptoms calmly is the difference between rescuing a cutting and panic-tossing it too early.
Yellowing of one older leaf can be normal as the cutting reallocates resources, while mushiness at the base is a red-alert signal that demands immediate action.
Slow progress can be completely normal in lower light, yet a cutting that is steadily declining needs a change in environment rather than more hope.
Common issues and what to do next
- Cloudy water: refresh water and rinse the container, then remove any decaying leaf bits.
- Soft stem base: cut above the mush to healthy tissue, sanitize tools, and restart in clean water or airy soil.
- Droopy leaves: reduce leaf load, increase humidity slightly, and ensure light is bright but not harsh.
- No roots for weeks: improve light consistency and warmth, then confirm the cutting includes a node.
- Mold on soil: increase airflow gently, reduce surface wetness, and consider a lighter mix next time.
Quick mini-projects: simple methods you can try this week
Small experiments teach faster than reading endless tips, especially when you compare two methods side-by-side and watch which one fits your space.
Trying multiple cuttings from the same plant reduces variability, because you can compare water versus soil without wondering whether the cutting itself was the problem.
Mini-project 1: water propagation versus soil propagation
- Take two similar cuttings from the same vine, each with one or two nodes and similar leaf size.
- Root one in clean water and root the other in an airy soil mix, keeping both in the same light.
- Track changes weekly, noting leaf firmness, any yellowing, and visible roots in the water cutting.
- Pot the water cutting when roots are established, then compare growth pace over the next month.
Mini-project 2: leaf load experiment for faster rooting
- Prepare two cuttings with equal nodes, then leave more leaves on one and fewer leaves on the other.
- Root both with the same method, maintaining the same light and temperature.
- Observe dehydration signs, because fewer leaves often reduce droop in dry rooms.
- Keep the best-performing approach as your default, because your home conditions are the real teacher.
Beginner guide to plant propagation: aftercare so your new plant actually grows
Propagation success is not the moment roots appear, because the real win is a cutting that transitions into steady growth without constant rescue.
Newly rooted plants prefer stability, which means consistent light, gentle watering, and a pause on fertilizer until the plant shows obvious new growth.
Repotting too soon can slow progress, because roots need time to fill the initial space before jumping into a larger pot.
Aftercare rules that keep new plants thriving
- Keep light bright and indirect, because stable energy supports new root and leaf development.
- Water when the plant needs it, not on a strict schedule, because young roots dislike extremes.
- Hold off on strong fertilizer at first, because tender roots can burn and growth can stall.
- Maintain moderate humidity when possible, because young plants dehydrate faster than established plants.
- Monitor pests weekly, because soft new growth can attract issues, especially in dry indoor air.
Final encouragement: propagation is a skill you build, not a trick you learn once
Every successful cutting teaches your hands what “healthy tissue” feels like, what “even moisture” looks like, and how patience becomes easier when you see small progress.
Focusing on easy plants first creates momentum, and momentum makes you brave enough to try slower species without turning the hobby into a stress test.
Keeping things clean, keeping nodes in the right place, and keeping conditions steady will carry you farther than any complicated method that looks impressive but feels fragile.
This content is independent and has no affiliation, sponsorship, or control by any entities mentioned.