Mulch can feel like the missing piece when you are watering constantly and still watching weeds pop up like they are racing you.
Clear, practical mulching basics will help you retain soil moisture, reduce weeds, and improve garden health without expensive tools or complicated routines.
Notice: this content is independent and has no affiliation, sponsorship, or control over any institutions, products, platforms, or third parties mentioned.
Mulch Benefits for Home Gardens: What Mulch Is and Why It Works
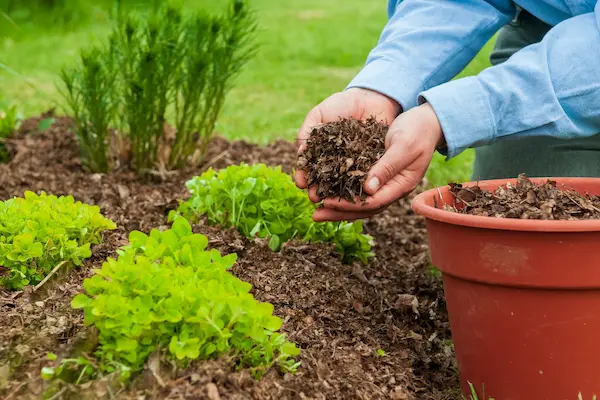
Mulch is simply a protective layer placed on top of soil, and its job is to reduce stress by buffering heat, slowing evaporation, and blocking light from weed seeds.
That “protective layer” can be organic material like shredded leaves or wood chips, or it can be inorganic material like gravel, yet the goals stay similar even when the material changes.
Many beginner gardens struggle because soil is left exposed, which makes moisture swing wildly, encourages crusting, and creates perfect conditions for weed seeds to germinate quickly.
A covered soil surface behaves more like a stable habitat, because it stays cooler during heat, warmer during light cold, and less likely to erode or splash onto leaves.
Less splashing matters more than it sounds, since soil splatter can move disease spores onto lower leaves and can also coat tender seedlings in gritty mud after heavy watering.
- Protection from sun reduces evaporation, which means the same watering lasts longer and plants experience fewer “dry panic” cycles.
- Shade at the soil surface slows weed germination, which means you spend more time enjoying the garden and less time pulling tiny invaders.
- Temperature buffering supports roots, which means growth stays steadier even when afternoons get hot and mornings still feel cool.
- Improved soil structure develops over time with organic mulches, which means the garden often becomes easier to water and easier to dig each season.
- Better overall garden health can follow, because strong roots and stable moisture make plants less vulnerable to many common stress-related problems.
A quick picture to keep in your mind
Imagine bare soil like a hot plate that heats up, dries out, and cracks, while mulched soil behaves more like a shaded forest floor that stays calmer and more predictable.
That mental image is useful because it keeps mulching from feeling like decoration, and it frames mulch as a simple climate-control tool for your root zone.
Mulching Basics: The Two Big Categories and How to Choose
Choosing mulch gets easier when you separate materials into organic mulches that break down and feed the soil, and inorganic mulches that mostly stay the same for a long time.
Organic options usually improve garden health over time because decomposition adds organic matter, which helps soil hold moisture while still letting roots breathe.
Inorganic options can be helpful in specific situations, yet they usually do not improve soil structure, and they can create heat buildup depending on color and placement.
Practical selection starts with the question of where the mulch will go, because vegetables, trees, paths, containers, and ornamental beds can benefit from different materials.
Budget matters too, since the best mulch is often the one you can apply consistently, refresh when needed, and source without turning a simple project into a stressful shopping mission.
- Organic mulches include shredded leaves, straw, wood chips, bark, pine needles, and thin layers of compost used as surface coverage.
- Inorganic mulches include gravel, stone, and some synthetic coverings, although careful use is important because airflow and water behavior can change.
- Living mulches include low-growing plants that cover soil, which can be powerful but require planning so they do not compete with the plants you want.
Simple questions that lead you to the right mulch faster
- Ask whether you want to build soil over time, because organic materials quietly improve structure and fertility as they break down.
- Consider how often you want to refresh mulch, because finer materials decompose faster while chunkier materials last longer.
- Think about appearance and practicality together, because a mulch you dislike looking at often becomes a mulch you stop maintaining.
- Check how wet or dry your garden runs, because moisture-loving beds benefit from water-holding mulches while already-wet beds need materials that do not trap excessive dampness.
- Decide how much weed pressure you face, because heavy weed problems usually need a thicker, more consistent layer to succeed.
Retain Soil Moisture: How Mulch Changes Watering Without Magic
Watering feels endless in many beginner gardens because sun and wind pull moisture out of bare soil quickly, which forces you into a cycle of frequent shallow watering.
Mulch breaks that cycle by slowing evaporation at the soil surface, so the moisture you add stays in the root zone longer instead of disappearing into the air.
Deeper roots usually follow when moisture stays available lower down, which means plants can handle missed watering better and can stay more stable during summer heat.
Uniform moisture also reduces cracking in clay-heavy soils and reduces hydrophobic behavior in sandy soils, which means water soaks in more evenly rather than running off.
Calmer moisture levels support microbes and earthworms, which helps garden health indirectly because living soil organisms function best when they are not constantly drying out.
- Reduced evaporation means fewer watering days, which often feels like immediate relief if you are already tired of daily watering.
- Improved infiltration means less runoff, which helps the garden absorb water rather than losing it down paths or into drains.
- Steadier moisture means fewer stress swings, which can reduce blossom drop and leaf scorch that often appear when plants alternate between drought and flood.
What changes in your routine after mulching properly
Instead of watering “a little bit often,” many gardens do better with “a good soak less often,” because mulch keeps that soak effective for longer.
Soil checks become more trustworthy when mulch is in place, because the surface stays cooler and you are less likely to be fooled by a crusty top that hides a dry root zone.
Morning watering becomes even more effective, because mulch helps soil hold that morning moisture through the heat of the day without needing a second rescue watering.
- Water deeply before you mulch, because mulching dry soil can trap dryness underneath and create a frustrating slow start.
- Check moisture by feeling under the mulch, because the soil beneath is what your plant roots actually experience.
- Extend the time between waterings gradually, because roots adapt better when the change happens steadily rather than suddenly.
- Watch plant posture at midday, because mild wilting during heat can be normal while constant limpness suggests the root zone is still drying too fast.
- Adjust based on weather, because mulched beds still need more water during heat waves and less during cool cloudy stretches.
Container gardens benefit too, with one important caveat
Potted plants dry out quickly because containers expose soil to air on all sides, so a thin mulch layer can noticeably slow drying and reduce how often you need to water.
Drainage still matters most in containers, since mulch cannot rescue a pot that stays soggy, and soggy roots often fail even when the top looks tidy.
- Thin layers work well in pots, because a heavy layer can trap too much surface moisture and invite fungus gnats in humid indoor or sheltered spaces.
- Light materials like shredded leaves can be useful, because they cover soil without creating a dense mat that blocks airflow.
- Clear space around stems remains essential, because constant dampness against a stem base can encourage rot in container environments.
Reduce Weeds: Why Mulch Is One of the Best Beginner Weed Tools
Weeds grow fast in frequently watered gardens because water wakes up weed seeds just as effectively as it wakes up your flowers and vegetables.
Mulch reduces weeds by blocking light from reaching many weed seeds, which slows germination and makes the weeds that do emerge weaker and easier to pull.
Consistent coverage matters because thin patches act like welcome mats for weeds, and weeds will always choose the easiest opening you leave behind.
Thick mulch works better than thin mulch, yet “thick” has limits, since extremely deep layers can trap too much moisture and reduce oxygen in some situations.
Maintenance becomes simpler when you treat mulching as a system rather than a one-time event, because the layer settles and breaks down and needs occasional refreshing.
- Light blocking reduces seed sprouting, which means fewer new weeds appear after rain or watering.
- Moisture stability reduces soil disturbance, which means you dig less and therefore bring fewer buried weed seeds to the surface.
- Easy pulling becomes common, which means weeds that do show up often slide out with less effort when mulch keeps the soil underneath softer.
A practical weed-suppression method that works in real gardens
- Remove existing weeds first, because mulching over tall weeds often turns into a slow disappointment as they push through the layer.
- Water the bed lightly after weeding, because moist soil helps the mulch settle without creating dry gaps.
- Apply mulch to a consistent thickness, because uneven layers create weak points where weeds can germinate.
- Keep mulch a few inches away from plant stems, because airflow at the base helps prevent rot and reduces hiding places for pests.
- Refresh thin spots every few weeks during heavy growth seasons, because the garden changes quickly when warmth and moisture accelerate decomposition.
What to do when weeds still appear
Some weeds will still show up because seeds arrive by wind, birds, compost, or neighboring yards, so the goal is usually reduction rather than total elimination.
Quick removal is easier than perfect removal, because pulling weeds small prevents root establishment and keeps you from needing deep digging that disrupts the soil surface.
- Pinch or pull weeds right after rain, because moist soil releases roots more cleanly and leaves fewer fragments behind.
- Top up mulch after pulling, because uncovered soil invites a fresh wave of germination within days during warm seasons.
- Focus on seed heads first, because stopping seed production reduces next month’s weeds more than any other single action.
Garden Health: How Mulch Supports Soil Life, Roots, and Plant Resilience
Garden health improves when roots experience a stable environment, because most plant stress starts below ground long before you see it on leaves.
Mulch buffers soil temperature, which helps beneficial microbes function more consistently and helps roots keep growing during temperature swings.
Organic mulches feed soil organisms as they decompose, which can improve structure so water and air move more naturally through the soil over time.
Better structure reduces compaction risk, since crumbly soil resists crusting and allows oxygen to reach roots, and oxygen is a quiet requirement for strong growth.
Less erosion protects fertility, because heavy rain can wash away the most nutrient-rich top layer when soil is bare and unprotected.
- Soil organisms thrive in stable moisture, which means a mulched bed often becomes more biologically active than the same bed left exposed.
- Root zones stay cooler in summer, which means plants can keep absorbing water instead of shutting down during extreme heat.
- Leaf cleanliness improves, which means fewer soil-borne splashes reach foliage and fewer lower leaves stay muddy after irrigation.
- Fungal networks can develop more steadily, which supports many plants by improving nutrient exchange and soil aggregation.
Why your plants can look “happier” even with the same fertilizer
Nutrients only help when roots can access them, so moisture stability and oxygen availability often determine plant performance more than adding more food.
Mulch supports that access by keeping roots active longer, and active roots are better at taking up water and nutrients without the stalling that happens during repeated stress cycles.
Common Mulch Types: Practical Examples, Pros, and Cons
Choosing a mulch becomes much easier when you picture how it behaves in your hands, because texture, weight, and breakdown speed affect how it performs in your specific garden.
Organic mulches generally improve soil while they suppress weeds, yet each material has small quirks that matter when you are aiming for simple and reliable results.
Inorganic mulches can be useful for paths and decorative beds, although heat reflection and limited soil improvement make them less ideal for many plant root zones.
Shredded leaves
Shredded leaves are one of the most beginner-friendly mulches because they are often free, they break down into soil-building material, and they protect soil well when applied evenly.
- Leaf mulch holds moisture nicely, which makes it helpful for gardeners who water often and still see soil dry quickly.
- Shredding reduces matting, which helps airflow and prevents a wet, slim layer that can repel water.
- Refreshing is easy, which means you can top up thin spots whenever you notice bare soil peeking through.
Straw
Straw works well in vegetable gardens because it creates a light, insulating layer that suppresses weeds and reduces soil splash onto edible leaves.
- Low weight makes it easy to spread, which helps beginners cover a full bed without feeling like the job requires heavy lifting.
- Decomposition happens steadily, which means straw can be part of a long-term soil-building plan when you refresh it as it breaks down.
- Seed contamination can occur, which is why occasional volunteer sprouts might appear and need quick removal.
Wood chips and bark
Wood chips and bark are excellent for perennial beds and around trees because they last longer, stay in place better, and create a tidy, durable surface layer.
- Longevity reduces work, which is helpful if you want fewer refresh cycles during busy seasons.
- Moisture retention can be strong, which makes chips useful in hot climates and helpful for gardeners who water frequently.
- Nitrogen concerns are often misunderstood, because nitrogen tie-up mainly happens where fresh wood is mixed into soil rather than when it sits on top as mulch.
Pine needles
Pine needles can be a practical mulch in areas where they are plentiful, because they knit together lightly, shed water gently, and resist compacting into a dense mat.
- Airflow remains decent, which helps when you want soil coverage without trapping heavy dampness.
- Sloped beds benefit, because needles can cling better than some loose materials and reduce sliding during rain.
- pH fear is usually exaggerated, because surface-applied needles tend to have mild effects and change happens slowly over time.
Grass clippings
Grass clippings can be useful when applied thinly, because thin layers break down quickly and return nutrients to the soil without needing transport or special tools.
- Thin applications reduce odor, which helps you avoid the slimy, sour layer that can form when clippings are piled too thickly.
- Drying first can help, because slightly dried clippings are less likely to mat and block oxygen at the soil surface.
- Careful sourcing matters, because clippings from lawns treated with certain products may not fit your natural garden care goals.
Compost as a surface layer
Compost can act like a gentle mulch when used as a thin top-dress, because it covers soil, supports microbes, and adds slow, balanced fertility.
- Thin layers prevent crusting, which helps compost behave like a soft blanket rather than a heavy cap.
- Weed suppression is moderate, which means compost often works best when combined with another mulch on top in weed-heavy areas.
- Soil improvement is strong, which makes compost a powerful choice when garden health and long-term structure are the main goals.
Gravel and stone
Gravel and stone mulches can be useful in decorative areas or dry landscapes, although heat reflection and limited soil building make them less friendly around many moisture-loving plants.
- Durability is high, which helps in paths where you want stable footing and less frequent maintenance.
- Heat buildup can be significant, which means tender plants can suffer if stones reflect sun and warm the root zone excessively.
- Weeds can still invade, which often surprises beginners because weed seeds land in the gaps and germinate in trapped dust and organic debris.
How to Apply Mulch Correctly: Step by Step Without Guessing
Correct application is where mulch shifts from “nice idea” to “visible results,” because thickness, placement, and timing determine whether you actually reduce weeds and retain soil moisture.
Preparation matters because mulching over problems rarely fixes them, and it often hides them until they become harder to correct later.
Step-by-step mulching basics for garden beds
- Clear weeds and remove thick mats of grass, because living weeds under mulch can keep growing and turn your layer into a disguise instead of a solution.
- Water the soil to a comfortable moisture level, because mulch locks in the moisture that exists when you apply it.
- Level the soil surface gently, because high clods create thin spots while low dips collect mulch too deeply.
- Spread mulch evenly to the recommended thickness, because consistent coverage is what blocks light and stabilizes moisture.
- Pull mulch back from stems and crowns, because air movement at the base reduces rot risk and prevents pests from hiding against tender tissue.
- Check coverage after a few days, because mulch settles and you may notice bare patches that need a quick top-up.
Step-by-step mulching for trees and shrubs
Trees and shrubs love a wide, gentle mulch ring because roots often spread far beyond the drip line, and a protected surface reduces competition from grass and weeds.
- Remove grass in a broad circle if possible, because turf competes strongly for water and nutrients and can slow young trees dramatically.
- Lay mulch in a flat, even layer, because a “mulch volcano” piled against the trunk can trap moisture and encourage bark problems.
- Keep several inches of space around the trunk, because the trunk needs airflow and should not sit in constant damp contact with mulch.
- Extend the mulch ring wider over time, because a wider ring usually means less stress during heat and fewer weeds stealing water.
- Refresh the ring when it thins, because tree roots benefit most when the layer stays consistent across seasons.
Step-by-step mulching for vegetable gardens
Vegetable beds often need a lighter touch because seedlings and stems can be sensitive, and air circulation helps reduce disease in dense summer growth.
- Wait until seedlings are established, because tiny sprouts can be buried or shaded too heavily if mulch is applied too early.
- Apply mulch around plants rather than on top of them, because stems and crowns stay healthier when they remain dry and exposed to airflow.
- Use a material that fits your crop, because straw and shredded leaves often behave gently around vegetables without creating a dense wet mat.
- Maintain clear watering access, because drip lines and soaker hoses work best when you can monitor and adjust moisture under the mulch.
- Pull mulch back slightly if slugs become an issue, because dense moist shelter can encourage slug hiding near certain tender crops.
Recommended Thickness: How Much Mulch Is Enough, and How Much Is Too Much
Thickness determines performance because weed suppression depends on light blocking, and moisture retention depends on slowing air movement across soil.
Too little mulch acts like decoration, yet too much mulch can trap excessive moisture, reduce oxygen, and create soft hiding spaces for pests near stems.
Material type matters because fluffy straw behaves differently than dense compost, so recommended depth should adjust to the mulch you choose.
- About 2 to 3 inches works well for many shredded leaf and fine organic mulches, because coverage stays even without turning into a soggy cap.
- About 3 to 4 inches can work well for wood chips in ornamental beds, because chips settle and still allow airflow when spread flat.
- About 1 to 2 inches can be appropriate for compost top-dressing, because thick compost layers can crust or hold too much surface moisture.
- Thin layers are best for grass clippings, because thick piles mat and can smell sour while blocking oxygen.
A simple “visual” way to judge depth without measuring tools
Hand depth is surprisingly helpful because two knuckles of coverage is often close to a couple of inches, while a full finger length of coverage moves you closer to deeper weed suppression.
Consistency matters more than precision because a flat, even layer performs better than a lumpy layer with bare patches and deep piles.
Keep Mulch Off Stems: The Small Detail That Prevents Big Problems
Mulch pressed against stems can trap moisture and reduce airflow, which increases the chance of rot and creates an easy hiding place for chewing pests.
Crowns and trunks are living tissue that need to stay relatively dry, so leaving a small mulch-free ring protects the plant even when you water frequently.
That small ring also makes inspection easier, because you can quickly spot damage, pests, or fungal issues at the base before they spread.
- Vegetables benefit from a clear collar, because soft stems rot faster when they stay damp.
- Perennials benefit from open crowns, because crown rot can kill a plant even when everything else looks fine.
- Trees benefit from exposed trunks, because bark problems can develop quietly under constantly damp mulch piles.
The classic “mulch volcano” mistake and a better alternative
A mulch volcano is when mulch is piled high against a trunk, and it often looks tidy at first while quietly increasing moisture stress and bark damage risk.
A flat donut-shaped ring is safer because the trunk stays clear, the root zone stays protected, and water can soak in without funneling rot risk to the bark.
Mulch Benefits for Home Gardens in Different Areas: Beds, Paths, and Pots
Different garden spaces benefit from different mulching strategies, because the goal in a flower bed is not identical to the goal in a muddy path or a patio container.
Smart placement reduces work because you put your best weed-blocking mulch where weeds bother you most, while using lighter materials where plants need more airflow.
Flower beds and ornamental borders
- Wood chips and shredded bark provide clean coverage, because they stay in place, suppress weeds well, and look tidy around established plants.
- Leaf mulch can be excellent, because it feeds the soil while still reducing evaporation and improving garden health over time.
- Layer consistency matters, because ornamental beds often hide weeds until they are tall enough to be annoying.
Vegetable beds
- Straw works well around many vegetables, because it keeps fruit cleaner and reduces soil splash onto leaves.
- Shredded leaves work well once plants are established, because they suppress weeds without overheating the soil as much as darker dense materials can.
- Compost as a thin top layer helps fertility, because it supports steady growth without pushing plants into fragile, overly lush leafiness.
Garden paths
- Wood chips work beautifully in paths, because they reduce mud, soften footing, and suppress weeds when applied thickly.
- Cardboard under chips can help initially, because it blocks light and reduces existing weed pressure while breaking down over time.
- Refreshing paths is normal, because foot traffic compacts and shifts materials and exposes thin spots that weeds will exploit.
Containers and raised planters
- Thin mulch reduces evaporation, because small soil volumes dry quickly in sun and wind.
- Airflow remains important, because container soils can stay damp near the surface if drainage is imperfect.
- Stem clearance stays essential, because wet mulch pressed against a pot plant’s base can create quick rot in confined conditions.
Common Mistakes That Make Mulch “Not Work,” and How to Fix Them
Most mulch frustration comes from a few predictable mistakes, because mulch is simple but it is not mind-reading, and it only performs well when applied correctly.
Fixes are usually fast once you identify the mistake, because you can adjust depth, correct placement, and improve consistency without ripping out your whole garden plan.
Mistake 1: Applying mulch too thinly
Thin mulch lets light through, which means weeds still germinate and you still lose moisture quickly, so the bed looks covered while behaving almost like bare soil.
- Add more mulch in a flat layer, because the goal is consistent coverage rather than random piles.
- Focus on the weed-prone edges first, because weeds often invade from borders and thin spots.
- Check again after settling, because a layer that looked thick can compress after rain.
Mistake 2: Mulching over tall weeds or grass
Weeds that already have energy stored can push through mulch, so the layer becomes a disguise that hides the problem until the weeds pop up again.
- Pull or cut weeds low first, because removing top growth reduces the plant’s ability to fight back immediately.
- Cover with mulch only after clearing, because new weed seedlings are easier to stop than established weeds.
- Refresh the layer after a week, because a second pass often catches spots that were missed the first time.
Mistake 3: Piling mulch against stems, crowns, or trunks
Stem contact keeps the base damp, which can cause rot and invite pests, especially in gardens where watering is frequent.
- Pull mulch back to create a collar, because airflow reduces disease risk and keeps the base visible for inspection.
- Flatten high piles into a wider ring, because width helps roots while height against stems increases risk.
- Monitor the base after rain, because persistent wetness near stems is a clear sign the mulch is too close.
Mistake 4: Using clumping materials in thick mats
Some materials mat down and block water, which can lead to runoff and uneven wetting where the surface looks damp while the root zone stays dry.
- Shred leaves before using them heavily, because shredding reduces matting and improves airflow.
- Apply grass clippings in thin layers, because thin layers dry and break down instead of turning slimy.
- Fluff compacted mulch gently after storms, because loosening restores water movement and reduces anaerobic pockets.
Mistake 5: Expecting zero weeds forever
Weed seeds travel constantly, so the realistic goal is fewer weeds and easier weeds, which is still a big quality-of-life upgrade in a home garden.
- Pull small weeds quickly, because early removal keeps the mulch layer intact and prevents deep rooting.
- Top up thin spots regularly, because consistent coverage is what keeps weed pressure low.
- Prevent seed production whenever possible, because stopping one weed from seeding can save months of future effort.
Seasonal Mulching: When to Apply, Refresh, and Adjust
Timing helps mulch work better because soil needs change across seasons, and a layer that is perfect in summer can be too heavy during a wet, cool spring.
Seasonal thinking also keeps your garden tidy because you refresh when it makes sense, rather than waiting until weeds and dryness force a bigger emergency project.
Spring
Spring mulching often works best after soil warms slightly, because overly early mulching in cold climates can keep soil cool and slow early growth for warm-season plants.
- Apply after planting and establishment, because seedlings can be buried or chilled if mulch is heavy too soon.
- Keep layers moderate in wet springs, because constantly damp soils need oxygen as much as they need moisture retention.
- Use mulch to stop early weed surges, because spring weed flushes often set the tone for the rest of the season.
Summer
Summer is where mulch shines because heat and evaporation peak, so the ability to retain soil moisture can dramatically reduce watering frequency and stress.
- Refresh thin areas during heat waves, because exposed soil dries quickly and forces you back into daily watering.
- Maintain stem clearance, because summer humidity plus wet mulch can increase rot pressure at plant bases.
- Pair mulch with deep watering, because deep water plus surface protection supports deeper roots and steadier growth.
Fall
Fall mulching can protect soil from erosion and heavy rain, while also feeding soil life as organic materials break down through cooler, wetter months.
- Use leaves as a resource, because fall leaf drop can become free mulch instead of waste.
- Top up around perennials, because stable winter moisture and temperature swings can stress crowns without protection.
- Keep trunks clear, because wet winter contact against bark increases risk even when pests are less visible.
Winter
Winter mulch can reduce freeze-thaw stress in cold climates, yet it should be applied thoughtfully so it does not trap excessive moisture against sensitive crowns.
- Protect tender perennials with breathable coverage, because the goal is insulation, not soggy smothering.
- Check for rodent hiding risks, because thick layers near stems can shelter animals that chew bark and crowns.
- Remove or pull back mulch slightly in early spring if soil stays cold, because warming soil supports earlier root activity for many plants.
A Visual, Beginner-Friendly “Mulch Plan” for the Gardener Who Waters Too Much
Overwatering is often a response to fast-drying soil and stressed plants, so mulch can reduce the pressure you feel to water constantly by making each watering last longer.
Better results come when mulch and watering work together, because mulch is not a substitute for water, but it is a multiplier of the water you apply.
Plan A: One weekend, one bed, noticeable improvement
- Pick the bed where weeds annoy you most, because visible relief builds motivation to keep going.
- Weed thoroughly and water deeply, because starting clean and moist helps mulch perform immediately.
- Apply the right thickness evenly, because consistency is what blocks weed light and slows evaporation.
- Create a clear collar around each plant base, because stem airflow prevents rot and keeps the bed easier to inspect.
- Check moisture under the mulch after two days, because learning how quickly your bed dries is the key to watering less without stressing plants.
Plan B: Three small sessions that feel easier than one big project
- Session one clears weeds and levels soil, because prep done well prevents most later frustrations.
- Session two applies mulch and shapes clear collars, because correct placement is where beginners often lose results.
- Session three tops up thin spots after settling, because mulch compresses and the final touch creates the long-lasting effect.
What to watch for during the first two weeks
- Soil under mulch should stay evenly damp longer, because that change is your signal to reduce watering frequency gradually.
- Weed emergence should slow, because fewer seeds receive the light cues needed to germinate.
- Plant posture should stabilize, because fewer moisture swings reduce midday stress and improve overall vigor.
- Mulch should not smell sour, because sour smells often mean the layer is too wet, too thick, or too compacted.
Gentle Safety and Responsibility Notes for Natural Garden Care
Even simple garden materials deserve careful use, because dust, molds, and irritants can affect sensitive gardeners, and pets or children may interact with mulched areas.
Local conditions matter because what stays airy and pleasant in a dry climate can mat and stay damp in a humid climate, so observation should guide small adjustments.
Reliable sources are worth consulting when you are uncertain about plant diseases, soil contamination concerns, or allergy risks, because accurate guidance protects both your garden and your household.
Notice: this content is independent and has no affiliation, sponsorship, or control over any institutions, retailers, laboratories, or third-party services you may consult.
- Gloves can be helpful when spreading mulch, because splinters and irritants are easier to avoid than to treat after the fact.
- Dust masks may be useful for sensitive gardeners, because dry materials can release fine particles during spreading.
- Storage should be thoughtful, because wet piles can heat and smell while also becoming unpleasant to handle.
- Pet access should be monitored, because some animals dig in fresh mulch and may chew pieces that are not meant to be eaten.
Mulch Benefits for Home Gardens: A Reusable Checklist You Can Follow Every Season
Checklists reduce overwhelm because they turn mulching into a predictable sequence, and predictable sequences are how beginners build confidence fast.
Before mulching
- Clear weeds thoroughly, because mulch works best as prevention rather than as a cover-up for established growth.
- Moisten soil to a comfortable level, because mulching locks in the moisture you have at that moment.
- Choose the right mulch for the area, because vegetables, trees, and paths benefit from different textures and breakdown speeds.
- Gather tools and a rake, because even spreading creates better results than dumping and hoping.
During application
- Spread evenly to the recommended thickness, because consistent depth blocks light and slows evaporation.
- Keep mulch off stems and trunks, because airflow at the base reduces rot risk.
- Shape a flat ring around trees, because flat coverage protects roots without harming bark.
- Check coverage after settling, because mulch compresses and reveals thin spots.
After mulching
- Water deeply if needed, because water helps the layer settle and helps roots take advantage of the new moisture stability.
- Monitor moisture under the layer, because watering schedules often need adjustment once evaporation slows.
- Pull new weeds quickly, because early removal keeps the system working without disturbance.
- Refresh thin areas periodically, because maintenance is lighter than rebuilding after months of neglect.
Final Encouragement: Mulch Turns High-Effort Gardening Into Steadier, Calmer Gardening
Practical mulching basics give you a strong advantage because the simplest way to reduce weeds and retain soil moisture is to protect the soil surface consistently.
Better garden health often follows because stable roots create stable plants, and stable plants are easier to care for even when weather and schedules get messy.